Hi! I am here today with a very different project. I had originally made these articles for the Altenew Educator blog hop in March. But the finishing work took longer than I expected and I ended up doing some fabric projects instead. Which was a good thing since I discovered a whole new application for my Altenew supplies. You can find all the details of that here.
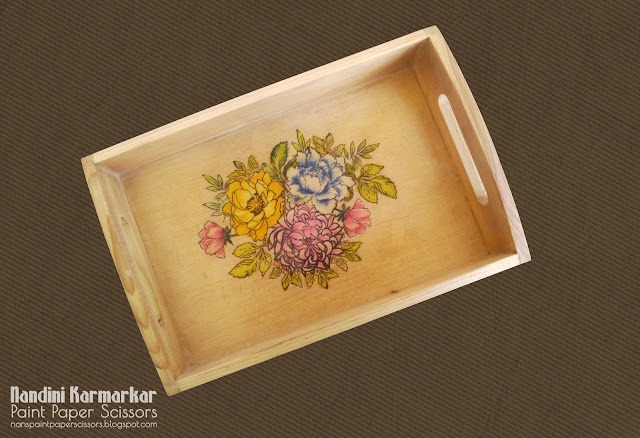
Coming back to the project today, I tried stamping on wood for the first time for my final project for the AECP Level 2. The brief was to create a home decor project. You can find all the details of that project here. This time too I made a tray and a set of coasters. Here is my project.

I started with a piece of wood covered with veneer. I cut out a paper of the same size and first planned out my design.

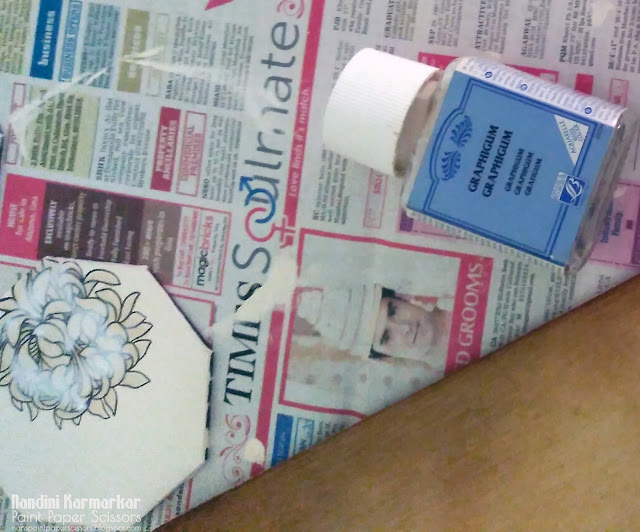
This step is vital as stamping on veneer is tougher than paper. Once the stamp touches the veneer, there is no way of rectifying any mistakes. Also, we cannot use a stamp positioner. Or restamp the images easily. Having a clear design in mind is very helpful in getting a good design. I used Japanese Mum, Peony Bouquet and Beautiful Day stamp sets for the cluster.

Here is a close-up of the stamped bouquet.

Once the outlines were stamped, I went back with the Altenew Crisp dye inks and stamped rest of the layers. Here is a look at the flowers with the stamped layers.

You can see the different mini cube ink sets I used. One thing to remember is, use the darker shades since the lighter shades don't show up well on the textured background.
Once the stamping was done, I masked the entire thing with masking paper and added brown ink with a brush.

For the smaller leaves, I diluted green and yellow inks and colored with a small brush. Here is a close-up of the completeed panel.

And the tray, after the framing and finishing.
The coasters were much easier to make since I used MDF which has a smooth surface. I covered each coaster with cream chalk paint and stamped a single flower on three. On the fourth, I stamped the bud and the leaves from the Peony Bouquet stamp set. I used only the outline stamps at this stage. Once the black ink was dry, I covered the stamped area with two layers of liquid masking fluid and allowed it to dry completely.
I used distress oxide inks with a brush to one side for inking on each coaster. After allowing the ink to dry, I removed the masking fluid and stamped the layers of each flower. Here is a look at the coasters.

I used a different set of mini ink cubes for each coaster. Here are the individual pics.
Rose Petal

Glacier Caves

Red Sunset

Pocketful of Sunshine, Warm & Cozy and Red Cosmos.

The varnish that was used to finish the tray and coasters and make the articles water proof did lighten the colors a lot. But my fear that the colors would run as they are water soluble didnot come true.
Here is another look at the tray and the coasters.

I hope you liked my experiments with my Altenew supplies and will give these a try. I am so happy that this worked as it opens up a whole new medium and range of products to stamp on and beautify. Please do let me know what you think of these articles as well as any suggestions for improvement.
Looking forward to hearing from you.
Entering these in the following challenges.
Simon Says Wednesday Challenge - Spring Moodboard:

Stinkin' Inkers Challenge Blog - Crafter's Choice:

Love,
Nandini.
Coming back to the project today, I tried stamping on wood for the first time for my final project for the AECP Level 2. The brief was to create a home decor project. You can find all the details of that project here. This time too I made a tray and a set of coasters. Here is my project.

I started with a piece of wood covered with veneer. I cut out a paper of the same size and first planned out my design.

This step is vital as stamping on veneer is tougher than paper. Once the stamp touches the veneer, there is no way of rectifying any mistakes. Also, we cannot use a stamp positioner. Or restamp the images easily. Having a clear design in mind is very helpful in getting a good design. I used Japanese Mum, Peony Bouquet and Beautiful Day stamp sets for the cluster.

Here is a close-up of the stamped bouquet.

Once the outlines were stamped, I went back with the Altenew Crisp dye inks and stamped rest of the layers. Here is a look at the flowers with the stamped layers.

You can see the different mini cube ink sets I used. One thing to remember is, use the darker shades since the lighter shades don't show up well on the textured background.
Once the stamping was done, I masked the entire thing with masking paper and added brown ink with a brush.

For the smaller leaves, I diluted green and yellow inks and colored with a small brush. Here is a close-up of the completeed panel.

And the tray, after the framing and finishing.

The coasters were much easier to make since I used MDF which has a smooth surface. I covered each coaster with cream chalk paint and stamped a single flower on three. On the fourth, I stamped the bud and the leaves from the Peony Bouquet stamp set. I used only the outline stamps at this stage. Once the black ink was dry, I covered the stamped area with two layers of liquid masking fluid and allowed it to dry completely.

I used distress oxide inks with a brush to one side for inking on each coaster. After allowing the ink to dry, I removed the masking fluid and stamped the layers of each flower. Here is a look at the coasters.

I used a different set of mini ink cubes for each coaster. Here are the individual pics.
Rose Petal

Glacier Caves

Red Sunset

Pocketful of Sunshine, Warm & Cozy and Red Cosmos.

The varnish that was used to finish the tray and coasters and make the articles water proof did lighten the colors a lot. But my fear that the colors would run as they are water soluble didnot come true.
Here is another look at the tray and the coasters.

I hope you liked my experiments with my Altenew supplies and will give these a try. I am so happy that this worked as it opens up a whole new medium and range of products to stamp on and beautify. Please do let me know what you think of these articles as well as any suggestions for improvement.
Looking forward to hearing from you.
Entering these in the following challenges.
Simon Says Wednesday Challenge - Spring Moodboard:
Stinkin' Inkers Challenge Blog - Crafter's Choice:

Nandini.
Your tray and coasters are gorgeous. You put a lot of work into this masterpiece. Thanks for joining the Stinkin' Inkers challenge.
ReplyDeleteWhat a wonderful project ! Love how it turned out ! One question : why did you choose to stamp on the veneer instead of stamping on the tray then put the veneer ? Do you think that the colours would melt together then ? Thanks in advance x
ReplyDeleteThanks for your appreciation. The veneer in this case is a paper thin layer of real pinewood adhered to a layer of plywood. We had made these bases and painted on them with acrylic paints as part of a large order of trays that were exported to Australia and the US. After painting they were framed and then finished with a layer of varnish. I have several bases left over from that order. For one or two trays it will be easier to simply buy the trays readymade. The pinewood has a beautiful texture and I wanted to preserve that. Hope this answers your question.
ReplyDeleteBEAUTIFUL work with this tutorial, Nandini! I love love what you did with the stamps and supplies! So glad that you join the fun with my “Show & Share”! WONDERFUL! Very happy to see your lovely work! Thank you for your support!
ReplyDeleteVery creative, I love the coasters. Thanks for sharing it with us at stinkin inkers Janet DT
ReplyDeleteThis is an amazing project and so well made. I love its function as well as form. A keepsake for years to come. Thanks so much for playing with us at Love to Craft Challenge Blog! XXO, Aimeslee DT
ReplyDeleteLove your project Mrs Karmakar.. Really nice
ReplyDelete