Monday, September 28, 2020

Quilt Style Hexagon Background with Layered Stamping...

Hi! I am here with another card I made for some challenges. This is a new technique I tried, inspired by a card by Yana Smakula. You can find the original card with a video tutorial here.

I started by cutting a bunch of shapes with the Hexagon Quilt die by Spellbinders out of watercolor paper. I bought this die a few years ago and never got around to using it. I am so happy that I finally used it! I played around with the shapes until I was happy with the pattern. For coloring the pieces, I used distress inks in shades of rust, blue, and teal. I just smooshed some ink on my media mat, sprayed water, and dunked the pieces into it. Once the pieces were dry, I started putting the card together. 

The floral bouquet is from the Magnolia stamp set by Mudra Craft Stamps. The sentiment is from another stamp by Mudra called Critter Party.

I put both stamps in a stamp positioner and stamped on a light cream card base with VersaFine Black Onyx ink. While the base dried, I prepared the die-cut pieces for stamping. The Stamping Mask Sheet by Mudra Craft Stamps was an invaluable tool in doing this. I simply trimmed a sheet of the masking paper to A2 size and arranged the die-cut pieces over it. The masking sheet ensured that my pieces didn’t move while stamping. I stamped again with the black ink. I had to do this couple of times as the paper was textured.

The rest of the card was very easy. It was like putting together a jigsaw puzzle. I popped up the pieces with foam tape and aligned them with the stamping on the card base.

The whole process of putting the card together actually went much faster than I expected! Here is another look at the completed card.

I hope you liked this card. Please do let me know if you want a video of the process in the comments.

Entering this card in the following challenges.

Mudra Craft Challenge #35:

Yes...Virginia September Show and Share:

NBUS Challenge #18:

I used the Spellbinders Hexagon Quilt die for the first time.

Retro Rubber Challenge #144:

The Magnolia stamp set was released by Mudra Craft Stamps in April 2018. It was part of my DT kit. It is also one of my favorite stamps from Mudra.

Color Throwdown #612:


Love,

Nandini

Thursday, September 24, 2020

Slim-line Card | Watercoloring with Dye Inks

Hi! I am here today with my very first slim-line card. Slim-line cards are such a hot trend right now! I really enjoyed working with different proportions for my card.

I started with a piece of watercolor paper measuring slightly more than 3” x 8”. I stamped the flowers from the Fresh Cut Roses stamp set by Mudra Craft Stamps with Versamark and heat embossed with Sea Foam embossing powder by Ranger. I smooshed Lemon Yellow and Tangerine Orange Mai inks on my mat with some water and pressed the watercolor paper over it.

Once the paper was dry, I used the Mai inks to watercolor the flowers. These were the inks I used – Flamingo Pink, Fuchsia Pink, Ruby Red, Lilac, and Ultra Violet. For the leaves, I used a mix of distress inks and watercolors.

The sentiment is from the Wishing You stamp set by MudraCraft Stamps. I stamped it with Versafine Black Onyx ink. I used a black marker to extend the lines across the width of the card.


To assemble the card, I cut a piece of foam slightly smaller than my water-colored panel and adhered the two together. To finish, I popped up the piece on a dark green card base measuring 3½” x 8½”. The card base is from the Paperum range by Mudra.

Here is another look at the finished card.


I had fun making this card and look forward to making more slim-line cards in the future.

Entering this card in the following challenges.

Mudra Craft Challenge #35:


Yes...Virginia September Show and Share:

Love,

Nandini


Saturday, September 19, 2020

Happy 80th Birthday Elena - Blog Hop

Hi! I am here today with a very special card for a very special lady. My fellow teamie from the Rainbow Card Challenge, Elena Chamberlaine, is celebrating her 80th birthday! Many happy returns of the day Elena!

All of us at the Rainbow Card Challenge agreed that this momentous day deserves a blog hop! So here we are, the DT of Rainbow Card Challenge celebrating Elena's special day. You must have arrived here from Katy's blog. I have the whole list below for your reference. You can also visit Elena at Elena's Ink Spot and enjoy her beautiful work.

I believe one of Elena's favorite colors is blue. So here is my blue card for her. The original card is in the mail and winging its way to her right now.


I used the Altenew Cross Stitch Flower stamp with the Glacier Caves mini ink cubes set for the flower. After stamping, I used the coordinating Cross Stitch Flower die. This die is a bit unusual. Instead of cutting the outline, it pierces little holes in the flower reinforcing the cross-stitch feel of the design. Here is a closeup.


I just love the added texture that this die gives. This is the first time I used the Cross Stitch Flower die and I am very happy to get it out of my NBUS stash.

I used nested circle dies to cut the stamped panel and also a speckled blue paper. I adhered the blue circle to a navy blue card base and added the stamped panel over it popped up with some foam.


The sentiment is from the Birthday Words die by Spellbinders. I cut it thrice out of white card stock and stacked the die cuts to get some dimension. I also added a heart instead of the tittle dot over the "i".

To finish, I added some sequins from my stash and rounded the bottom right corner. Here is another look at the card.


I hope you liked my card. I look forward to hearing from you. You can continue the hop by visiting Sue N next. I also have the whole list for you below.

Rainbow Card Challenge
Em
Izzy
Katy
Nandini - You are here
Sue N
Sue T
Elena

Entering this card in the following challenges:

Yes...Virginia September Show and Share:

NBUS Challenge #18:

I used the Altenew Cross Stitch Flower die which I bought a long time ago.

Love,

Nandini


Monday, September 14, 2020

Altenew Educators "Style it with Stencils" Blog Hop and Linky Party + Giveaway


Hi! Hope you are enjoying the latest blog hop by Altenew Educators. You must have reached here after visiting Amy Hill. She is such an amazing crafter and I am always inspired by her beautiful work!

I am a huge fan of Altenew and I love working with stencils! My first introduction to stencils was in college while studying Textile Design. Back in those days, there were no stencils available in the market. So we used to design and then hand-cut the stencils. I am so happy now with the amazing range of stencils that are available now!

Stencils are one of the most versatile and inexpensive craft tools you can have. There are many, many different techniques you can do with them. And as long as you use them with care, they will last you forever. I still have many of the hand-cut stencils from my college days.

I am going to show you three different ways in which you can use stencils today. I am using the Sunburst stencil by Altenew for all my projects. I used large pieces of white cardstock measuring around 6" x 6" for the inking. This allowed me to make two cards out of each background. 

I also have a neat trick that I used to make sure my stencil stayed in place. I simply applied some repositionable adhesive to the back of the stencil. This allowed me to just press my stencil into place and work on it without stressing about it moving or putting tons of washi tape. After my inking was done, I used an erasure and gently rubbed away any adhesive that was on the paper.

So let's start with our projects for today.

First up are two cards that I created out of one background.


I first used Fresh Lemon ink from the Pocketful of Sunshine mini ink cubes set to ink the Sunburst stencil. After the inking was done, I rotated the stencil slightly and applied Coral Berry ink from the Red Cosmos mini ink cubes set. Here is a close up of the finished panel.


Since the background was so bold, I kept my cards very simple. For the first card, I cut the panel slightly smaller than an A2 sized card base and mounted it with some foam on an orange card base.

I die-cut a small heart and stamped the sentiment from the Persian Motifs stamp set with Firebrick ink from the Warm & Cozy mini ink cubes set on a strip of white paper.


Here is another look at the completed card.


I created the second card with a narrow strip of the background leftover from the first card.


I started with a cream card base and added splatters with Fresh Lemon and Firebrick inks. Once the inks were dry, I stamped the sentiment from the Sweetest Pea stamp set on a piece of orange cardstock.


I adhered the sentiment panel on the card base and added the stenciled strip with some foam tape over it. Here is another look at the finished card.


Here are both the cards together.


You can create really bold and graphic backgrounds using stencils. I have a video tutorial showing you the next background I created. You can check it out here by clicking on the pic below or head to my YouTube channel.


Here is the first card.


I trimmed the background to fit an A2 size card base and rounded the corners. I also die-cut a rectangle with rounded corners. The sentiment is from the Signature Words die set which I die-cut out of some white paper.


I just popped everything up with foam tape to complete the card. Here is another look at the card.


Some more pics of the card.


The second card was made out of the scraps leftover from the two stenciled backgrounds.


I took a cream card base and added some black splatters. While the ink was drying, 
I took a long piece of black cardstock and glued the leftover strips of paper and black paper. I trimmed the rectangle and then inked the edges with black dye ink. The floral sprig is from the Fresh Freesia stamp set. I stamped the image and then die-cut it with the coordinating die. I also stamped the sentiment from the Birthday Greetings stamp set on the card base and rounded the corner.

The striped panel and the die-cut sprig were both popped up with foam tape and added to the card.


This is my favorite card today. And I am happy that I used up every bit of the two backgrounds that I created!


And both the cards together.


I always like to find ways to use my card making supplies for other projects. And stencils can be used for home decor, fabrics, apparel; the list is really endless! For my last project, I used it on a small wooden box.


First I painted the box with black chalk paint. I used two layers to ensure a good solid color.


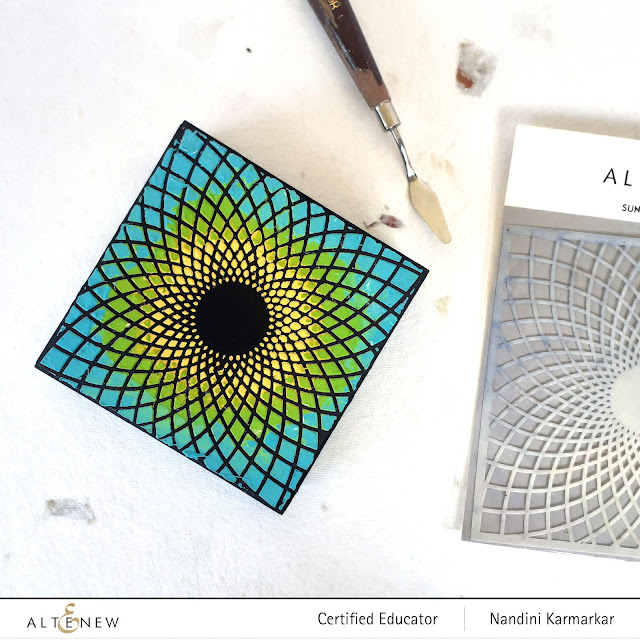
Once the paint was completely dry, I attached the Sunburst stencil to the top of the lid. I mixed acrylic paints in golden yellow, green, and teal with some texture paste. The trick is getting the proportion of paint and texture paste right. If you add too much paint the mix becomes runny and seeps under the stencil. If there is too much texture paste, it looks chalky. It is a good idea to test the mix before you start with your project.


Once I was happy with the consistency, I applied the paste through the stencil with a palette knife. I started with yellow, then green and finally teal. Once the paste was applied, I carefully removed the stencil and left the piece to dry overnight.


Here is a close-up of the stenciling.


I gently removed the extra bits of texture paste that were sticking out and then touched it up with black chalk paint. Here is the completed box.


This box is great for holding small knickknacks.
 

It will also work for gifting chocolates or pedhas.


I hope you like my projects and find them inspiring. I would love to know which is your favorite project today. 

The next person on the hop is Maryam Sharara. She is such an amazing crafter! I am a big fan of her work! Here is the complete list in case you want to go back to the beginning or missed someone.


Nenette S. Madero

Irina Fonina

Vicki Finger

Virginia Lu

And finally, no hop is complete without some prizes. 

Prizes:

Altenew is giving away a $20 gift certificate to 5 lucky winners! Please leave a comment here on the Altenew Card Blog by 9/19/2020 for a chance to win. 

We’ll also draw a winner to receive a $15 Altenew gift certificate from the comments left on each designer’s blog on the blog hop list below. All winners will be announced on the Altenew Winners Page on 9/22/2020.

There’s MORE! We will pick 2 of our favorite handmade creations from those who joined the linky party and they will each receive a $15 Altenew gift certificate!

Love,
Nandini