Hi! I love the Triangle Turnabout stamp by Concord & 9th. But lining it up is difficult and I have really struggled with it. This time I was determined to crack it and after some trial and error, I finally succeeded! I even included it in my workshop where we made cards with the Triangle and Wreath Turnabout stamps. Here is my first card.
I started with a 5½ x 5½ inch piece of ivory cardstock. I temporarily adhered it to the template and started stamping with Altenew inks. After each rotation, I manually adjusted the stamp to get good alignment. Once the stamping was done, I trimmed the panel. The smaller strip was made into another card which I will share later. I took a panel of dark pink cardstock and trimmed the sides with the Stitched Scallop Border die by Lawn Fawn. I adhered both panels to a top folding green card base.
The sentiment is from Birthday Greetings stamp set by Altenew. I stamped it with green ink on a panel of ivory card stock and added some pink with an Artists marker. To finish, I added the sentiment panel popped up with foam tape over a larger green mat. Here is a close up of the sentiment panel.
Another look at the card.
I am very happy with this card. And I am also happy that I finally managed to get a hang of this stamp set.
Entering my card in the following challenges:
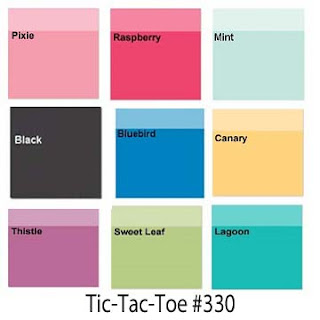
Color Dare #330:
I chose the bottom with purplish pink, green and teal. I have also used other colors from the grid.
Stamping Sensations February - All Things Bright & Beautiful:
ModSquad Challenge - Brand Name Clear or Rubber Stamps:
I used Concord & 9th Triangle Turnabout and Altenew Birthday Greetings stamp sets.
Addicted To CAS Challenge #153:
Love,
Nandini
Hi! I am back after a short break post completing my projects for Altenew Academy. I am just a step away from my certification and super excited about it. The final challenge is conducting a workshop. I have always enjoyed teaching and I am having fun planning it. The workshop will be held in Mumbai on March 3rd. I have also started teaching CAS style cards. The card today is one of the projects we did. The technique is from the Clean, Simple and Colorful Techniques class taught by Laura Bassen for the Altenew Academy.
I started with a panel of ivory cardstock and a bunch of distress inks. I used masking tapes and did ink blending to get a rainbow background. I also added some splatters with gold acrylic paint. Here is a closer look at the blending.
While the panel dried, I used the Let's Celebrate stamp and die set by Pinkfresh Studio to create the top panel. Since the background was very colourful, I decided to keep the stamping simple. To finish I simply popped up the stamped panel with foam tape and adhered both to a top folding ivory card base. Here is another look at the final card.
I love the way this card turned out. And my student had a blast making it. I would love to make this into a shaker card too.
Entering this card in the following challenges:
Pinkfresh Studio February 2019 Challenge:
Yes Virginia... February Show & Share:
Stamping Sensations February - All Things Bright And Beautiful:
Cardz For Galz Challenge #90 - Weather:
Watercooler Wednesday WWC208:
Love,
Nandini
Hi! This is my final card for the Altenew Academy's All About Layering 3 class. I thoroughly enjoyed the great techniques taught by Lydia Evans. And I am very happy that I completed my homework for all 6 classes. Today's card is based on Day 4 of the class. One of the bonus inspiration cards had the sentiment die embossed on the card. I loved the idea and decided to give it a try.
I stamped the flower from the Cross Stitch Flower set by Altenew in the upper left corner of a panel of white cardstock. I embossed the Simple Hello sentiment die with the help of the embossing pads. Recently Jennifer Macguire did a post where she enhanced the embossed areas with inking or stamping. Here is her original post. I loved the idea and created a mask out of plain printer paper and sponged two shades of Coffee Break inks over the sentiment. Here is a closer look.
To finish, I stamped a tiny heart over the sentiment and mounted the panel on a green card base with foam tape. Here is another look at the card.
I hope you liked my card. The All About You 1, 2, and 3 classes are currently free at Altenew Academy. I would highly recommend them for anyone who loves multistep stamps and wants to improve their work.
Entering this card in the following challenges:
Simon Says Stamp Wednesday Challenge - Anything Goes:
Stamping Sensations: February - All Things Bright & Beautiful:
Love,
Nandini
Hi! Today's card is based on Day 1 of Altenew Academy's All About Layering 3 class taught by the amazing Lydia Evans. Lydia layered a die-cut vellum frame with a card stock frame for a beautiful look. Unfortunately, I couldn't find any suitable frame dies in my stash. The thing I noted, however, was that the vellum softened the look. So I decided to think a bit out of the box and use vellum behind a die-cut sentiment. Here is my card.
I took a panel of white cardstock and stamped the flower from the Cross Stitch Flower set by Altenew in the lower right corner. I die-cut the Simple Hello sentiment from the top left of the panel. I took a small piece of vellum and drew diagonal lines with a matching Artist Marker. I adhered the vellum behind the 'Hello' and stamped a companion sentiment from the set below with matching ink. Here is a closer look at the sentiment.
To finish, I simply popped the panel on foam tape and adhered it to a red card base. Here is another look at the card.
I love the way this card turned out. I used the Cross Stitch Flower and Simply Hello die for the first time. I found the layers a bit tough to line up. But it is doable with a little practice. And the end result is gorgeous! I made 4 panels in different colours with the same set. I will post the cards as I make them.
Entering this card in the following challenges:
Simon Says Wednesday Challenge - Anything Goes:
Addicted To CAS Challenge #151:
Allsorts Challenge Week 504 - Friends:
Aud Sentiments #219 - Anything Goes + Sentiment:
Moving Along With The Times #90 - Add A Sentiment:
Love,
Nandini
Hi! Today's card is based on Day 3 of Altenew Academy's All About Layering 3 class taught by the amazing Lydia Evans. The card taught in class had a monogram with small flowers scattered around it. I thought this look would work with a frame as well. Here is my card.
I started with a sheet of watercolour paper stamped with a bunch of outlines from the Painted Flowers stamp set by Altenew. I had stamped some of them with the base layer in yellow. I still can't remember why! Anyway, I die-cut the images out and sprayed them with water. I scribbled some pink and red brush pens by Camlin and dabbed the colour on the flowers with a damp brush. I added two shades of green to the leaves and allowed them to dry. Really love the artsy watercolour look I got. I also added some gold splatters to the die-cut flowers so that they matched the sentiment.
For the card base, I took a top folding black one and did some black-on-black stamping with the Kaisercraft Script stamp to add some subtle texture to the background. I stamped the sentiment from the Birthday Greetings stamp set by ALtenew with Versamark and heat embossed with gold EP. I also used a gold glitter pen to fill up the word 'Happy'.
The frame is from Mudra Craft Stamps. Initially, I had planned on colouring it. But I loved the way it looked against the black base. So I kept it raw and adhered it to the card base with liquid glue. I arranged the die-cut flowers around the frame, tucking some underneath and popping some on foam tape. Here is a closer look at the arrangement.
To finish, I added some gold sequins by Mudra Craft Stamps randomly. Here is another look at the card.
I hope you like my card today and will check out this great class.
Entering this card in the following challenges.
Altenew January 2019 Inspiration Challenge:
Simon Says Stamp Wednesday Challenge:
Just Add Ink #442 - Sketch:
Creative Knockouts #283 - Flower Power:
Love,
Nandini