Showing posts with label Artist Markers. Show all posts

Tuesday, May 4, 2021

Altenew Exotic Garden Stamps/Dies/Stencils/Embossing Folders Collection Release Blog Hop + Giveaway


Hi! I am so happy to be a part of this blog hop! you must have reached here from the blog of Joylita Dsouza. isn't she just amazing? 

You can check out the entire May 2021 Exotic Garden release collection here.

I have six cards for you today.


Card #1:

The first product that I reached for when I got my box of goodies was the Beautiful Baroque 3D Embossing Folder. I just love the graceful design. 


For the first card, I simply inked the cardstock with distress oxide inks and ran it through my die-cutting machine. Before removing the paper from the embossing folder, I lightly brushed some white pigment ink over the raised areas for more definition. 


The sentiment is from the Leaf Canopy stamp set and was heat embossed with metallic gold embossing powder.


To assemble the card, I trimmed the panel and popped it up on a dark blue card base.


Card #2:

The second card was made using the Beautiful Baroque 3D Embossing Folder again.


I used a brayer to apply distress oxide inks in pink and violet to the flat side of the embossing folder. When I ran the paper through it, the raised embossing remained white. 


The sentiment is from the Leaf Canopy stamp set, heat embossed with metallic gold embossing powder.


To assemble the card, I trimmed the panel and mounted it on a dark blue card base.

Here are both the cards I made using the Beautiful Baroque 3D Embossing Folder. 


I just love the way these cards turned out!


Card #3:

Since I was having so much fun with the 3D embossing folders, I decided to use the Monstera Leaves 3D Embossing Folder for my third card.


This time I pulled out my Brushos and sprinkled yellow and green powders into the depressions. I also used a small brush to ensure that there was no powder on the background. I sprayed both the embossing folder and the watercolor paper generously and ran it through the die-cutting machine. I allowed the panel to air-dry overnight so that the pigments would have a chance to spread naturally.


The sentiment is from the new Carpe Diem stamp set, which has a number of beautiful sentiments in different languages. I heat embossed it with metallic gold embossing powder.


To assemble the card, I trimmed the embossed panel and a slightly larger piece of black card stock. I added both to a kraft card base.


Card #4:

This was probably the fastest card I made! This was also the first time I used the beautiful Altenew Slim Washi Tapes.


I stamped the paisley motif from the Painted Rainbow stamp set on some white paper and colored it with Altenew Artist Markers. I used markers from Sets A, E, Red Sunset, and Summer Afternoon. After coloring the motif, I reinserted it into my stamp positioned and heat embossed the outline with black embossing powder. Once it was done, I cut it with the coordinating die.


For the card base, I used a pale pink one. I simply added the Cherry Blossom washi tapes towards the bottom of the card and flicked a little black ink for the splatters. 


The sentiment is from the Carpe Diem stamp set, also from this release.


To finish, I rounded the bottom corners with a corner rounder.


Card #5:

The Blooming Tulips stamp set is one of my favorites in this release. It is a beautifully layered stamp that looks amazing in any color combo! I decided to use some dark red paper for my stamping.


I stamped the outline of the flower and the second layers of the leaf and stem with Versamark and heat embossed with metallic gold embossing powder. I also stamped the second layer of the flower with Velvet ink.


After die-cutting all the elements, I arranged them on a long panel of the same dark red paper. Before I adhered the die-cuts, I added some texture to the background with Velvet ink and the Sunburst Stencil. 


The sentiment is also from the Blooming Tulips stamp set, heat embossed with some sparkly gold embossing powder. I used the same embossing powder for the flower centers.


To finish the card, I adhered the finished panel to a kraft card base.


Card #6:

My last card is my absolute favorite! And I give all the credit to the wonderful Lydia Evans! I recently completed her ‘All AboutLayering 6’ class at the Altenew Academy. It is an amazing class and it is totally free! The focus is on getting the most out of your 3D dies. 


Creating a peek-a-boo effect was one of the techniques Lydia covered and I have wanted to give it a try since.


When I saw the new Succulents Layering die set, I thought the layers looked like flowers. I cut a number of pieces out of white card stock, using almost all the dies. I lightly inked the die-cuts using Bamboo, Ocean Waves and Volcano Lake inks. Once the base layer was ready, I used my bone folder to score one side and attached it to the card base. 


I added the second layer and allowed it to dry. The last layer was cut out of some pale yellow card stock.


The sentiment is from the BAF Japanese Mum stamp set. I stamped it partially with Maple Yellow ink to match the flower centers. After trimming the panel, I popped it up on the card using the new Instant Dimension Foam Tape. The sentiment inside the card is from the Leaf Canopy stamp set and stamped with black ink.


Here is another look at the completed card.


I hope you liked my cards. I would love to hear which is your favorite card and your favorite product today! Here are all the products I used from the new Exotic Garden release. Click on the image to head to the Altenew store.


There are some great freebies and giveaways up for grabs!


Here are THREE ways to get a FREEBIE to kickstart your creativity! Free gift will be added to the cart automatically. 

  • Get a FREE brand new Exotic Garden Stamp & Die Release Inspiration Guide (worth $5.99) with every order of high-value Exotic Garden release bundles. Shop HERE! *Exclusions apply.
  • Get a FREE brand new Creative Jump Start Class with every order from the new Exotic Garden release collection from 05/04/2021 through 05/10/2021. Shop HERE!
  • Get a FREE brand new Exotic Garden Stamp & Die Release Mini Inspiration Guide with every order from 05/04/2021 through 05/06/2021. Shop HERE!

Giveaway Prizes

$300 in total prizes! To celebrate this release, Altenew is giving away a $50 gift certificate to 2 lucky winners and a $25 gift certificate to 8 winners! Please leave a comment on the Altenew Card Blog and/or each designer’s blog post on the blog hop list below by 05/10/2021 for a chance to win. 

Altenew will draw 10 random winners from the comments left on each stop of this blog hop and announce the winners on the Altenew Winners Page on 05/12/2021.

I am the last person in this hop. You can always start again at the Altenew Blog or refer to the full list below to visit anyone you might have missed!


Altenew Blog

Jennifer McGuire

Jaycee Gaspar

Amanda Baldwin

Nicole Watt

Vicky Papaioannou

Emily Midgett

Carol Hintermeier

Norine Borys 

Erin Thompson

Agnieszka Małyszek

Helen Kalb

Amber Rain Davis

Jenny Colacicco

Svitlana Shayevich

Erum Tasneem

Kymona Tracey

Keren Baker

Virginia Lu

LauraJane

Lilith Eeckels

Linda Westfall

Maryam Perez

Michelle Short

Therese Calvird

Verity Biddlecombe

Tania Ahmed

Sandhya Iyer

Reiko Tsuchida

Seeka

Nathalie DeSousa

Teresa Litchfield

Laurie Willison

Ardyth Percy-Robb

Tina Smith

Tricia Schaden 

Joylita Dsouza

Nandini Karmarkar - That's me!


Love,

Nandini


Thursday, January 7, 2021

Rainbow Card Challenge #25 – Nothin’ But Neutrals…

Hi! Welcome to another great challenge at the Rainbow Card Challenges. The mood board this month is gorgeous!

I created a one layer card with lots of masking. This card is completely inspired by the gorgeous monochromatic card by Erum Tasneem who blogs at VIBGYOR Krafts. You can find her original card here. There is also a detailed process video. So be sure to check it out!

I started with a piece of speckled cardstock in light cream. I stamped the flowers and leaves from the Sweet Rose stamp set by Mudra Craft Stamps. I used Altenew inks in shades of brown and grey. Here is a closer look at the stamping.

Once my stamping was complete, I lightly drew lines with a scale and pencil. I colored between the lines using a light grey Artist Marker by Altenew and outlined each with a darker grey. Once the coloring was done, I trimmed the panel and adhered it to a dark brown card base. The sentiment is from the Fresh Freesia stamp set by Altenew. I heat embossed it with copper embossing powder.

Here is another look at the card.

I hope you liked my card and are inspired to create something beautiful! Please do check out the Rainbow Card Challenge blog for more inspiration. And don’t forget to link your cards to our gallery. I look forward to seeing your beautiful creations.

Love,

Nandini

Saturday, August 1, 2020

Rainbow Card Challenge - Radiant Ruby...

Hi! Welcome back to the Rainbow Card Challenge. I am here with my inspiration for the August challenge.


The mood board this month is so rich and vibrant that I was very inspired! I love the color red and I had lots of fun creating this card.


I used Yana Smakula's tutorial for Blending Free Coloring with Copic for reference. This is a great technique if you are intimidated by blending colors or just prefer a more graphic look. I used the Spring Flowers stamp set and coordinating dies by Simon Says Stamp for the flowers. I did the coloring with the Artist Markers by Altenew.


For the background, I decided on a tone-on-tone look. I used two shades of red and die-cut the darker paper with the Basket cover die by Pink & Main twice. I removed only the square pieces, leaving the rest in as I did not want a very busy background. And then I adhered the pieces together to get some depth. Here is a close-up.


The sentiment is from the Party Time stamp set by STAMPlorations. To create the striped bit under the sentiment panel, I used one of the borders from the Interlocking Backdrops set by Lawn Fawn sentiment and stamped it in red on a scrap of white paper.


To finish, I arranged all the elements on the card base and used glue and foam tape to adhere them down. Here is another look at the finished card.


I hope you are inspired by my card and create something beautiful. You can visit the Rainbow Card Challenge blog for more inspiration from the DT and link your creations. I look forward to seeing you in our gallery!

Love,
Nandini
Wednesday, June 10, 2020

Altenew Educators "Giving Thanks" Blog Hop and Linky Party + Giveaway


Hi! I hope all of you are enjoying the latest blog hop by the Altenew Educators. You should have arrived here from the super talented Amy Hill. I am a huge fan of her beautiful work!

I completed my Altenew Educator certification in March 2018. It was an amazing experience! Each class I took taught me so much and helped me better myself. The final step was conducting a workshop. The Altenew team, especially Virginia Lu was a great help in planning and conducting the workshop. Two years down the line, I have started conducting workshops at home. It is a great way of sharing my love for card making with others.

Altenew blog hops have given me an opportunity to experiment with my supplies for projects other than cards or scrapbooks. This time I decided to create a home décor project. I have always been fascinated with paper tole and 3D decoupage. I used the Sweetest Peas stamp set to create a frame.


I started by stamping the flowers from the set on white cardstock with black ink. After drying the ink, I colored the flowers with my Zigs. I used the brush pens directly as I wanted the colors to be intense. I used three shades for each flower, adding the darkest, then the medium, and finally blending with the lightest color. Once the coloring was done, I fussy cut the images.


To create the background, I took a piece of handmade paper measuring around 8” x 6”. I lightly inked it with distress oxide inks in blue and green and added some splatters of black ink. Once the panel was dry, I stamped the images with black ink. I used my Jet Black Artist marker to darken the lines and also edge the flowers with black.


I cut the flowers apart and popped them up with foam tape to achieve a 3D effect. Here is the completed panel.


I got the panel professionally framed. Here is an angled look at the panel.


I also created a tag with the Sweetest Peas stamp set, using similar techniques. The idea was to create a gift set.


I am in love with the artsy look of these flowers!


The sentiment is from the Leaf Canopy stamp set. I heat embossed it with pale blue embossing powder.


Here is another look at my frame and gift tag.


Whenever we think of stamps and dies, we tend to think in terms of paper. But I have always enjoyed challenging myself to use my supplies with other mediums. And one of my favorites is fabric. I grew up sewing and also trained as a textile designer in college. So I created another home décor project using my Altenew supplies.


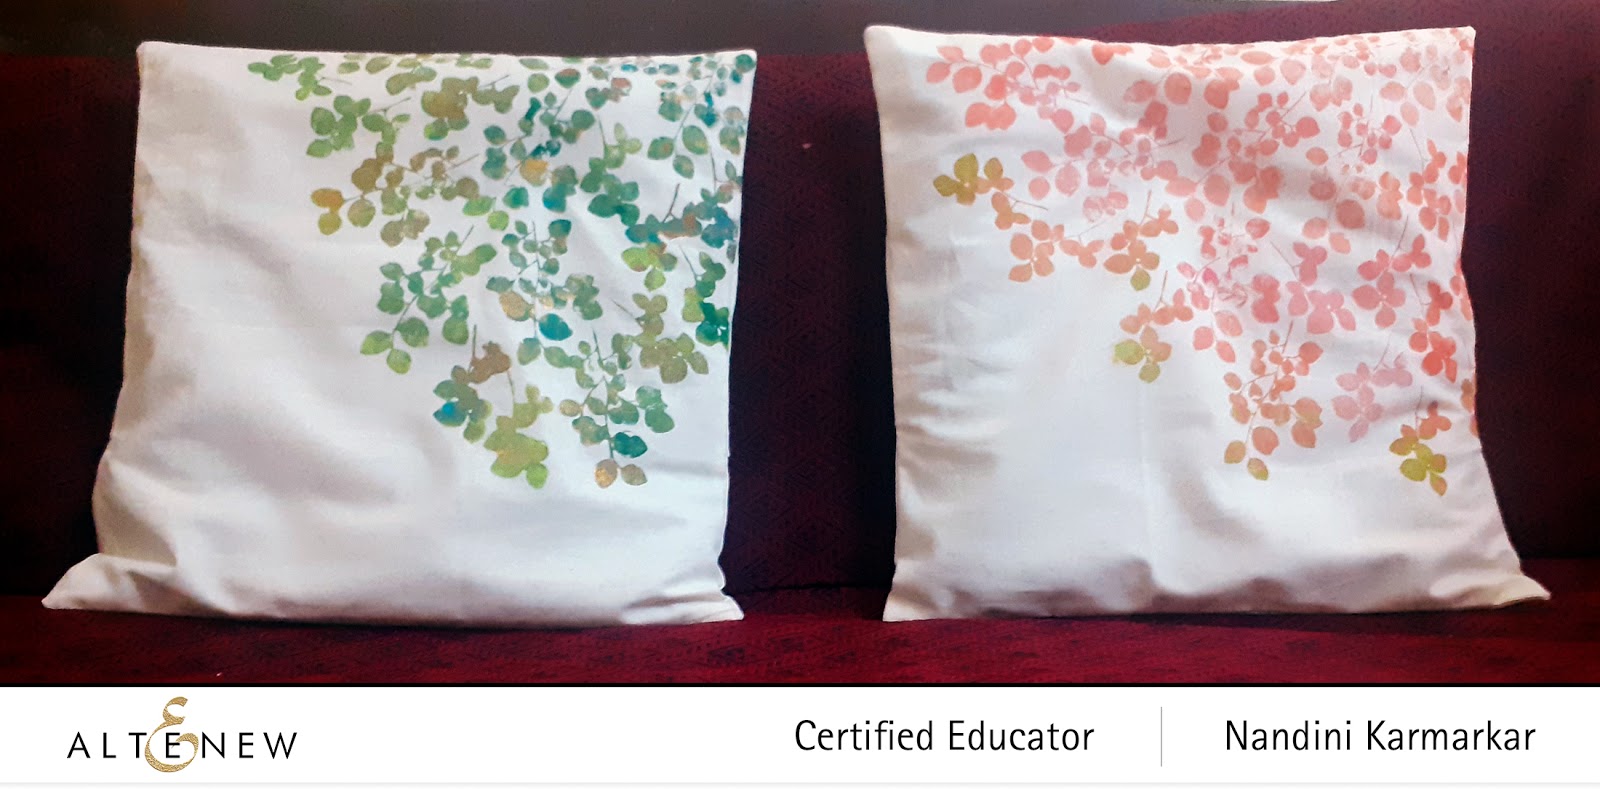
I used the solid images from the Leaf Canopy stamp set and acrylic paints to stamp on some cushion covers.


I have a good sewing machine and created these covers from scratch. You can also use readymade cotton cushion covers. I cut a square measuring 16” x 16” out of cream cotton fabric and marked the stitching lines. Used a mix of different acrylic paints in shades green, blue, pink, and orange. I also used gold for some shine. I mounted the stamps on acrylic blocks and applied the paints with finger daubers. Once my stamping was done, I allowed the panels to dry overnight. After ironing the panels on the back to set the colors, I stitched them up into cushion covers.


I used shades of green and blue, with touches of gold and orange.


For this cover, I used shades of orange, coral, and pink and added some gold. I used a little bit of green only on the outer edge.

Here are the cushions gracing the sofa in my drawing-room. The sofa is very old and came along with the house. I am happy that my stamped cushion covers are adding some style to the room!


I also created a simple tag to go with the cushion covers.


I die-cut circles out of cream and black cardstock. I inked the background with distress oxide inks and added some water droplets. After drying the panel, I stamped the sentiment from the same set with black ink. I die cut the large branch with the coordinating die for the Leaf Canopy set and adhered it to the inked panel.

I was required to complete 20 classes by Altenew Academy for my certification. These classes are so amazing that I continued taking them even today. The latest one I took was the All About Layering 5 by Lydia Evans. It is a fantastic series if you want to learn the tricks and tips for layering stamps. And it is free! I made lots of cards using the techniques from this class. And this one, using acetate is my favorite!


I used the Fresh Freesia stamp set to stamp several flowers on ivory cardstock. I colored the flowers with my Altenew Artist Markers and die-cut them with the coordinating die. Here is a close-up of the flowers.


I followed the wonderful video by Lydia Evans to create the card. The sentiment is from the same stamp set.


Here is another look at the card.


I hope you enjoyed my projects and have some new ideas for using your Altenew products with different mediums. I also hope you check out the classes offered by Altenew Academy as well as the new virtual classes. Trust me, you won't be disappointed!

No blog hop is complete without some cool prizes! 

Prizes:
Altenew is giving away a $30 gift certificate to 3 lucky winners! Please leave a comment here on the Altenew Card Blog by 6/17/2020 for a chance to win. 

We’ll also draw a winner to receive a $15 Altenew gift certificate from the comments left on each designer’s blog on the blog hop list below. All winners will be announced on the Card Blog on 6/21/2020.

This is no ordinary hop! We want you to join in on the fun as well. There is a Linky Party going on at the Altenew Card Blog. All you have to do is link up your creations based on the theme of the hop, which is, “Giving Thanks” and mention that you are taking part in the Altenew Educators Blog Hop and Linky Party. So what are you waiting for?! Link up!

There’s MORE! We will pick 2 of our favorite handmade creations from those who joined the linky party and they will each receive a $15 Altenew gift certificate!

Special offer:
FREE U.S. shipping with code HAPPY6T or $5 OFF international shipping with code SHOPPING6T at checkout on orders over $29.
Offer valid from 6/10/2020 at 12:01 am EDT through6/11/2020 at 11:59 pm EDT.
Shop HERE! Not valid on prior purchases. Cannot be combined with other promo codes. Not valid on Altenew Academy Classes and Virtual Workshops.

You can continue the hop by visiting Nancy McClelland. She is an amazing crafter and always has inspiring projects to share. I am also sharing the blog hop list in case you want to start at the beginning.

Nandini Karmarkar - That's me!

Love,
Nandini