Showing posts with label Pinkfresh Studio. Show all posts

Wednesday, June 14, 2023

Addicted To Stamps And More #448 - Birthdays...

Hello! I hope you are ready for some inspiration for the Addicted To Stamps And More challenge. The theme this time is:


I created a fun card using the leftover die-cut pieces from another card. I have used all Pinkfresh Studio products for this card.


I hope you liked my card and will create something beautiful for this challenge. You can link your creations to the ATSM gallery. Please don't forget to visit the other DT who have some incredible inspiration for you. I look forward to visiting you in our gallery.

Love,
Nandini

Friday, June 9, 2023

Happy Little Stampers Anything Goes With Dies Challenge - June 2023...

Hi! Welcome back to the Happy Little Stampers Challenge. I hope you guys are looking forward to another exciting challenge.

I created a card using some Pinkfresh Studio supplies from my stash. The technique is by Gina K and you can check out her video here.


I used the large stamp from the Just A Little Lovely stamp set to create my background and cut it out with the Simply Hexagons cover plate die. I used the same stamp set to stamp on the envelope.

The sentiment is from the Let's Celebrate stamp and die set.


I hope my card inspires you to create something beautiful. You can visit the Happy Little Stampers challenge blog for more inspiration and link your creations to our gallery.

Entering this card in the following challenges:


Love,

Nandini

Wednesday, January 19, 2022

Addicted To Stamps And More #421 - Make Your Mark...

Hi! Wishing all of you a fantastic 2022! I am back after a break with some inspiration for the Addicted To Stamps And More blog. The theme this time is:

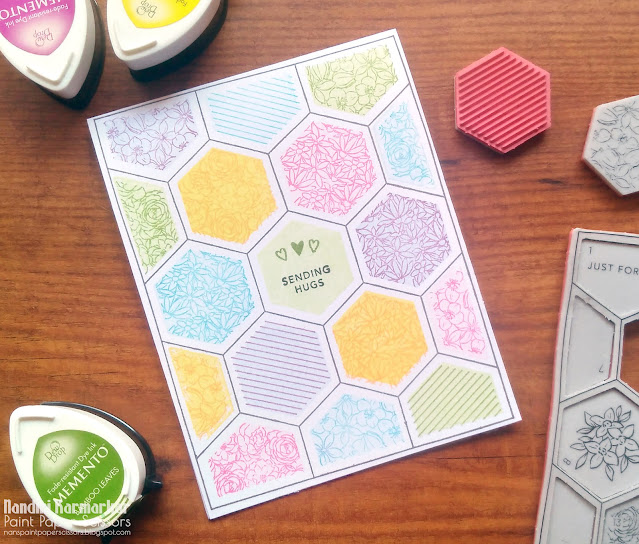
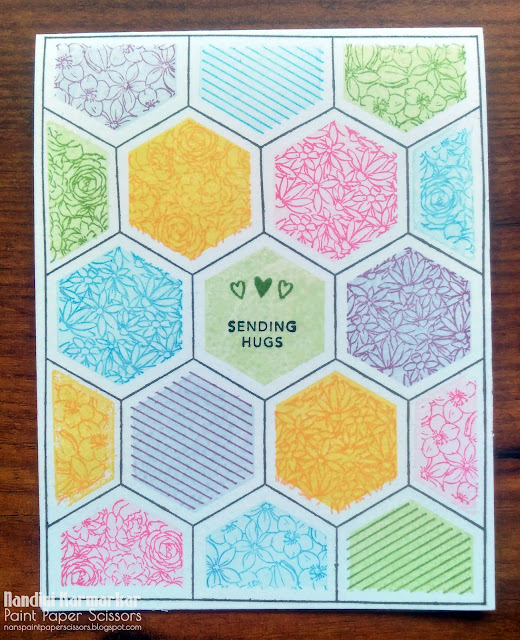
I got a chance to play with some new goodies that I bought during the Black Friday sale. I have always been a big fan of Pinkfresh Studio designs. And their pop out stamps have been on my wish list for a long time. I created a one layer card using the Pop Out: Hexagons stamp set.


I used Memento inks for the stamping. Here is another look at the card.


I hope you liked my card and will create something beautiful for this challenge. You can link your creations to the ATSM gallery. Please don't forget to visit the other DT who have some incredible inspiration for you. I look forward to visiting you in our gallery.

Entering this card in the Pinkfresh Studio January 2022 challenge. My card is inspired by the May 2021 prompt - Anything Goes.


Love,

Nandini

Saturday, November 14, 2020

Tag #1 - 25 Days of Christmas Tags

Hi! My first tag inspired by the 25 Days of Christmas Tags event hosted by Tracey McNeely on her blog In My Creative Opinion. 


This tag is inspired by Lindsay Larsen's beautiful tags on Day 5. Here is the link to her original post. I was very impressed by her clean design. I just loved the combo of kraft, black and white. I also made a short video to show you my process of creating this tag. You can watch the video on YouTube here.

I used the Forest Friends stamp set by Pinkfresh Studio. The sentiment is from the Christmas Poinsettia stamp set by Mudra Craft Stamps. I designed this stamp set couple of years ago.


Love,

Nandini


Sunday, November 1, 2020

Rainbow Card Challenge - Sparkling Sapphire...

Hi! I am here with my inspiration card for another great challenge at the Rainbow Card Challenges. The mood board this month is gorgeous!

I created a card with layered stenciling as my inspiration.

I used two stencils by CrafTreat called Floral Fusion Positive & Negative Dots. These are 6" x 6" stencils that can be used separately or together.

I started with the Negative Dots stencil and applied distress oxide inks in shades of blue to a piece of white cardstock to create an ombre effect. After my stenciling was done, there was a lot of ink on the stencil. So I sprayed it lightly with water and pressed it against a piece of white cardstock. After drying my papers, I attached the Positive Dots stencil to the inked paper with washi tape and added some Little Birdie sparkle embossing paste with a palette knife. I allowed the panel to air dry.

Once both the panels were ready, I cut them into four parts and got two backgrounds out of them. I rounded the corners and popped up the pieces on some dark blue cardstock. 

The sentiment is from the Let's Celebrate stamp set by Pinkfresh Studio. I stamped it with distress oxide ink and adhered it to my card over a piece of vellum.

Here is another look at the card.


I hope you liked my card and are inspired to create something beautiful! Please do check out the Rainbow Card Challenge blog for more inspiration. And don’t forget to link your cards to our gallery. I look forward to seeing your beautiful creations.

Entering this card in the following challenges.

Simon Says Monday Challenge - Inspired by a Movie:

Inspired by the 1980s movie the Blue Lagoon

CAS(E) this Sketch #396:


Simon Says Wednesday Challenge:

STAMPlorations Stencil Challenge:


Make My Monday Challenge #134 - Masculine:

Love,

Nandini


Monday, February 17, 2020

In Memory of Bill Blog Hop...


Hi. Today I am here as part of the blog hop to support Sue Trembeth during a difficult time. Sue is a beloved member of the design team at The Rainbow Card Challenge Blog. Her elder brother Bill passed away from esophageal cancer some time back. Losing a loved member of our family is always tough. My thoughts and prayers are with Sue and her family during this difficult time. 

The theme is periwinkle, the color of esophageal cancer awareness. Here is my card.


I started with a panel of watercolor paper on which I stamped the flowers from the Lil Inkers Inky Flowers stamp set with Versamark ink. I heat embossed the flowers with white embossing powder. After the heat embossing was done, I used distress inks in shades of blue and violet for ink smooshing. I allowed the panel to dry and then added some more ink to the flowers with a brush to make them pop a bit more. Here is a closer look at the left side of the panel


And the right side


I kept the rest of the card very simple. After trimming the panel, I mounted it over a black mat on a grey card base. The sentiment is from the Forest Friends stamp set by Pinkfresh Studio. I heat embossed it in white on a scrap of black paper.


Here is another look at the completed card.


Your next stop is the awesome Mary Ellen Driggs. You can also start at the beginning. Here is a list of all the stops of the blog hop.

Mynn Kitchen
Rocky Crafter
Em Fairley
Nandini Karmarkar - That's me!
Mary Ellen Driggs
LeAnn Skinner
Lee Ann Barrett
Gietje Boja-Ligthart
Ewa Pas
Jacqueline Mantle
The Rainbow Card Challenge Blog

Love,
Nandini

Saturday, February 1, 2020

Rainbow Card Challenge - Fiercely Fuschia...

Hi! I am here today with the February challenge at the Rainbow Card Challenge. Every month we have a monochromatic or rainbow-colored photo inspiration. Here is this month's pic.


I am not a very pink sort of girl. But I had fun creating the inspiration card as I got a chance to play with some new products. I used the new Shilpi Alcohol Inks for my background. The owner of Shilpi, Shilpa Kenia, was kind enough to send me some inks and Yupo paper some time back. I absolutely loved them! The colors are gorgeous and the quality is great. I can't wait to get more of these fabulous inks! Here is the card I made.


I started with a piece of Yupo paper and randomly squirted the inks. I then added some blending medium to move things and left the piece to dry. I just love the vibrant colors. Here is a closer look.


I die-cut the Framed Flower Branch out of white cardstock and adhere d it to the background. I adhered the panel to a piece of black foam cut slightly larger and adhered that to a top folding card base. The sentiment is from the Birthday Greetings stamp set by Altenew. I heat embossed it with metallic pink embossing powder. To finish, I added some half pearls from my stash. 

Here is a look at the completed card.


I am so happy with this card! I hope you find it inspiring and look forward to your creations in our gallery. Please do visit the  Rainbow Card Challenge for more inspiration and to link your cards to the gallery.  I would also highly recommend the new Shilpi Alcohol Inks. There is a whole range of products that you can check out here. Their quality is great and I am always happy to support Indian brands.

Entering this card in the following challenge.
Love,
Nandini

Papercraft Challenge #26...

Hi! Welcome back to the February challenge at the Papercraft Challenge blog. We celebrate Valentine's Day in February, so this month's theme is Love / Valentine's Day. There are so many creative possibilities with this theme! I am looking forward to going through all the lovely creations in our gallery. If you want some inspiration, do visit us at the Papercraft Challenge blog where the DT has a great array of fabulous creations for you. You can also visit the Papercraft Business site for some great tools that can help you take your papercraft business to the next level. Like the awesome Papercraft Business Planner that helps you keep track of your favorite challenges!

A challenge is even more fun if there is a prize to be won. This month the winning prize is this cute Whale You Be Mine stamp set by Lawn Fawn.


My inspiration card for this challenge is a simple design with lots of texture. I created this card as part of my homework for the Mission: Inspiration class by Nicole Watts for Altenew Academy. If you are like me and spend lots of time on the net searching for inspiration, this is the class for you!

Here is my card.


I started with a piece of watercolor paper and the Sunburst stencil by Altenew. I applied the Mixed Media Paste by Little Birdie through the stencil and allowed it to dry completely. Made by Itsy Bitsy India, the Mixed Media paste is a great product. Applied directly it works as texture or embossing paste. It can also be diluted with water and used as gesso. I applied some Sparkle Paste, also by Little Birdie around the center of the panel. 


Here is a closer look at the panel. 


I trimmed the panel slightly smaller than an A2 card and adhered it with foam tape on a top folding ivory card base. The sentiment is from the Love Scale stamp set by Pinkfresh Studio. I stamped it in pink and die-cut it with the coordinating die. I popped it up with foam tape over a heart die-cut out of pink handmade paper.


I love the shimmer that spotlights the heart.


Here is another look at the completed card.


I hope you like my sweet and simple Valentine's Day card. I look forward to your entries in our gallery.

You can get more information about Papercraft Challenge Planner here. It is an invaluable tool for all crafters who love taking part in challenges. The Papercraft Business site also has tools that can help you take your business to the next level.


Looking forward to hearing from you.

Love,
Nandini

Friday, September 13, 2019

Artsy Card with Pinkfresh Studios...

Hi! I am here today with a card which is a bit different from my usual style.  I made this card for the STAMPtember celebration, where Simon Says Stamp is releasing a new collaborative set with different companies every day. One of the brands is Pinkfresh Studios. I am a big fan of Pinkfresh Studio products. I love their designs, especially the dies. The delicate Floral Squares die set is really beautiful, with six different designs. I used three of the squares to create my card.


I started with a piece of white watercolour paper by Itsy Bitsy and smooshed distress inks in red, yellow and green with pieces of acetate on it. The secret to getting a good look with smooshing is to dry the colour between layers. Otherwise, the colours mix and become muddy. Once I was happy with the colours, I splattered some water droplets for a distressed look. After drying the panel, I splattered black ink with a brush. Here is a closer look at the panel.


The squares were die-cut out of black paper and adhered to the panel with liquid glue. I glued the panel to a black card base directly, tilting it a bit for a more artsy look. The sentiment is from the Fresh Freesia stamp set by Altenew. I stamped it on a scrap of black paper and heat embossed it with Wow! Rich Gold embossing powder. Here is a closer look.


Here is another look at the completed card.


I am entering this card in the following challenges:

Pinkfresh Studio STAMPtember 2019 Collaboration:


Color Throwdown #560:


HLS September Watercolor Challenge:


The Flower Challenge #36 - Anything Goes:


Love,

Nandini

Monday, September 9, 2019

Happy Little Stampers September Challenge...

Hi! I am here with my inspiration for the September challenge at the Happy Little Stampers Anything Goes with Dies challenge. If you love playing with your dies, this is the challenge for you. 


I created an easel card as inspiration. I also plan on using this card as a sample for a demo on die-cutting that I am doing at a local craft store.


I started with some black cardstock that I cut with the Labels and Frames Stitched die by Sizzix. You need three identical pieces for an easel card - one top piece and two pieces cut on a fold. To assemble the card, fold one of the pieces in half and adhere the top piece over it. Here is the opened card.


I also cut out a bunch of wreaths from red, orange, dark orange, yellow and pink colored papers. I layered the wreath die cuts and adhered them with glue. The sentiment is from the Say It With Florals set by Pinkfresh Studio. I stamped and heat embossed it with the Gold Tinsel embossing powder by Ranger. Here is a closer look at the card.


To finish, I cut a smaller piece out of the orange card and adhered it to the base. I also added two half pearls to keep the easel propped up when open. Since I didn't have them in gold, I simply used my gold Sharpie marker to colour them.

Here is another look at the completed card.


Hope you find my card inspiring and pull out your dies to play. You can check out the Happy Little Stampers Anything Goes with Dies challenge blog for more inspiration and also link your creations. Looking forward to seeing your cards in our gallery.

Love,
Nandini

Monday, February 18, 2019

Rainbow Birthday with Pinkfresh Studio...

Hi! I am back after a short break post completing my projects for Altenew Academy. I am just a step away from my certification and super excited about it. The final challenge is conducting a workshop. I have always enjoyed teaching and I am having fun planning it. The workshop will be held in Mumbai on March 3rd. I have also started teaching CAS style cards. The card today is one of the projects we did. The technique is from the Clean, Simple and Colorful Techniques class taught by Laura Bassen for the Altenew Academy.


I started with a panel of ivory cardstock and a bunch of distress inks. I used masking tapes and did ink blending to get a rainbow background. I also added some splatters with gold acrylic paint. Here is a closer look at the blending.


While the panel dried, I used the Let's Celebrate stamp and die set by Pinkfresh Studio to create the top panel. Since the background was very colourful, I decided to keep the stamping simple. To finish I simply popped up the stamped panel with foam tape and adhered both to a top folding ivory card base. Here is another look at the final card.


I love the way this card turned out. And my student had a blast making it. I would love to make this into a shaker card too.

Entering this card in the following challenges:

Pinkfresh Studio February 2019 Challenge:

Yes Virginia... February Show & Share:


Stamping Sensations February - All Things Bright And Beautiful:

Cardz For Galz Challenge #90 - Weather:

Watercooler Wednesday WWC208:


Love,
Nandini