Showing posts with label Stamplorations. Show all posts

Thursday, August 5, 2021

30 Days Coloring Challenge - Day #4

Simple watercolor painting today. For more tags or bookmarks


STAMPlorations New Beginning Stamp Set + Camlin Artists Watercolours

Love,

Nandini

Tuesday, June 1, 2021

Rainbow Card Challenge #30 – Radically Rainbow…

Hi! Welcome to another great challenge at the Rainbow Card Challenges. The mood board this month is one of our all-time favorite themes! 


I had fun creating this quick and simple card. 


I used the candle stamp from the Simply Celebrate stamp set by Lawn Fawn. I colored my candles in rainbow order using my Zigs. The sentiment is from the Party Time stamp set by STAMPlorations.


I hope you liked my card and are inspired to create something beautiful! Please do check out the Rainbow Card Challenge blog for more inspiration. And don’t forget to link your cards to our gallery. I look forward to seeing your beautiful creations.

Love,

Nandini

Saturday, August 1, 2020

Rainbow Card Challenge - Radiant Ruby...

Hi! Welcome back to the Rainbow Card Challenge. I am here with my inspiration for the August challenge.


The mood board this month is so rich and vibrant that I was very inspired! I love the color red and I had lots of fun creating this card.


I used Yana Smakula's tutorial for Blending Free Coloring with Copic for reference. This is a great technique if you are intimidated by blending colors or just prefer a more graphic look. I used the Spring Flowers stamp set and coordinating dies by Simon Says Stamp for the flowers. I did the coloring with the Artist Markers by Altenew.


For the background, I decided on a tone-on-tone look. I used two shades of red and die-cut the darker paper with the Basket cover die by Pink & Main twice. I removed only the square pieces, leaving the rest in as I did not want a very busy background. And then I adhered the pieces together to get some depth. Here is a close-up.


The sentiment is from the Party Time stamp set by STAMPlorations. To create the striped bit under the sentiment panel, I used one of the borders from the Interlocking Backdrops set by Lawn Fawn sentiment and stamped it in red on a scrap of white paper.


To finish, I arranged all the elements on the card base and used glue and foam tape to adhere them down. Here is another look at the finished card.


I hope you are inspired by my card and create something beautiful. You can visit the Rainbow Card Challenge blog for more inspiration from the DT and link your creations. I look forward to seeing you in our gallery!

Love,
Nandini

Sunday, June 28, 2020

Papercrafter Unite Against Racism Blog Hop...

Hi! Thank you for participating in the Papercrafters Unite Against Racism Blog Hop! You must have arrived here from Jo Herbert's blog.

I am so excited that you are joining in for this great cause! The goal of this hop is to come together to stand behind our crafty sisters and brothers of colour not just in the art industry, but also to show our support in the never-ending fight for equality all over the world.


This hop is the brainchild of Justine Hovey. You can visit her blog for more details of this worthwhile cause.

I made a couple of bookmark cards for this hop. The original idea of the bookmark card is by Jennifer McGuire. You can find her post here.

I love the concept as I love reading and often make bookmarks as gifts. Here is my card.


I used the New Begining stamp set by STAMPlorations and my Zigs for the bookmark. The sentiment is also from the same set.


Once my panel was ready, I adhered it to a piece of kraft cardstock folded in half. 


To complete the card, I made a couple of slits in the red card base. One was at the top fold and another halfway down the card. The slits were fractionally larger than the bookmark so that I could tuck it in.


The bookmark can be easily slipped off the card base and used in a book.


For the second card, I used a slightly different technique. 


I used the New Beginning stamp set by STAMPlorations again along with my Zigs. To create the bookmark, I scored an ivory panel ¼ inch from the top and adhered the colored panel to it. Once the glue was dry, I trimmed both to get a bookmark.


I took a panel of kraft cardstock ½ inch larger than the bookmark and cut a slit towards the top. I glued the panel to the red card base taking care to apply glue only to the top and the edges, leaving a large pocket in the center. Once the glue was dry, I slipped the bookmark in through the slit at the top.


Here is another look at the card.


I hoped you liked my cards and will give this technique a try. I would love to see your twist on this type of card.

The next stop on the hop is Ishani. In case you are lost or want to start from the beginning, here is the entire list.

Neha Parab
Fairuz Fabiha (aka Craftivation)
Joy Dsouza
Jo Herbert
Nandini Karmarkar - That's me!
Ishani
Stacy Zant
Tricia Y
Mary Ellen Driggs
Margaret Schuering
Justine Hovey
Alison Heikkila
Ardyth Percy-Robb
Natasha
Marcia Dehn-Nix
Sandy Allnock
Erin Reed
Martha Lucia Gomez / Joy Clair Designs
Juliana Michaels
Amy Hill
Betz Golden
Erica A-B
Angie Cimbalo
Rebecca
Karen Hasheck 
Char Kochensparger (chark)
Jess
Jill Lipscomb of Jill Cameron Creations
Dana Warren

Mansi Bhatia
Ingrid
Charlotte E (Lady Joyful)
Carrie Rhoades

Anna Mahtani
Jessica McAfee
Amber Rain Davis
Kari VanNoy
Kathya Kalinine
Annette Witherspoon
Mona Toth
Natasha Davies
Anja Glauner
Robin Flenner
Nancy Salkeld
Eva Costigan
Michelle Woerner
Haley Pettit
Verity Biddlecombe

Love,
Nandini


Wednesday, June 20, 2018

Addiced To Stamps And More #297...

Hi! Another great challenge is here from the Addicted To Stamps And More challenge blog. This week it is


I decided to pull out an old, never-before-used stamp set by STAMPlorations. Here is the card I created.


I stamped the Framed Zinia on a piece of plain white cardstock with Versamark Onyx Black ink. I colored it with my Zigs, blending pink and yellow colors with a wet brush. These markers are so easy to work with! I am really glad I bought them! I added a little black and brown to the edges and the flower centres. Once the piece was dry I trimmed it, covered it with Versamark ink and heat embossed with clear embossing powder. I did five layers of embossing for a nice glossy finish. 

Here is a closer look at the panel.


The pink matting is a scrap of paper from my stash. The black card base was stamped with the Linen Background stamp by My Favorite Things with Versamark and heat embossed with clear embossing powder. 

I decided to forego a sentiment since I felt the card looks striking the way it is.

I hope you like my card and are inspired to create something beautiful. Please do visit us at Addicted To Stamps And More Challenges for more amazing inspiration and to link your creations. Looking forward to seeing you in our gallery.

Entering my card in the following challenges.

The Flower Challenge #21:
I based my card on two previous challenges:
#10 - Embossing Heat / Dry
#3 - Use An Older Stamp, Die or Stencil


Back To Basics & Beyond #5 - Heat Embossing:

STAMPlorations Never-ending Anything Goes Challenge:

CAS Mix Up Challenge:


Love,
Nandini

Sunday, January 28, 2018

Product Review For Itsy Bitsy...

Hi! Sometime back I received a call from Itsy Bitsy asking me to do a product review for them. I was, of course, more than happy to do it! I received three shades of Fairy Sparkle, Texture Tack and a pack of Fleece White card stock.

I made several cards using these products and I am very, very happy and impressed with the quality.


I used simple stamping for the first card.


I used the Mini Modern Blooms stamp set by My Favorite Things and Memento dew drop inks to create an all over design. I then dipped the broad end of my brush into the texture tack and dotted it at the center of the flowers. I sprinkled the Fairy Dust over it and let it dry for some time. The sentiment is from the Recollections You Are Lovely stamp set. 

I really love the crisp and bright images I got with the Fleece White paper and the little bit of bling that the Fairy Sparkle added.

Here are two more cards I made with Fleece White card stock and simple stamping.


A blue and white card made using the Folk Sentiments set by Docrafts with Bahama Blue ink by Memento. You can find more details here.


Made with the Peony Bouquet and the Painted Greetings stamp sets by Altenew. You can find more details here.


For my second card I decided to use stenciling.


I took a piece of paper that my kids has colored with distress inks from my scrap pile. I used a stencil that I had hand cut ages ago and applied some Indian Jamun distress ink by Artistry. I shifted the stencil slightly and applied Texture Tack through it. I then sprinkled the Fairy Sparkle and left it to dry. To match the card base I trimmed the Texture White paper to size and applied the ink directly.

I love the artsy look of this card. It is very easy to use the Texture Tack with a stencil and I love that it washes off very well.


For the third card I decided to combine the Fairy Sparkle with die cuts.


I first created my panel with the Leafy Pattern stencil by Mudra. The word die is by STAMPlorations. I cut it and then covered it with Texture Tack. I pressed the whole thing in a pool of Fairy Sparkle and left it to dry. To finish, I popped up the panel on a matching card base and adhered the sentiment to it.


For my final card I wanted to try something different. I decided to try stamping with texture tack.


I took a piece of Texture White card stock and stamped several flowers and leaves from the Freehand Florals stamp set by Wplus9 and die cut it with the matching dies. This is a beautiful layering set and I stamped one layer with texture tack. I added some Fairy Sparkle and allowed it to dry. The Sentiment is from Geometrical Patterns stamp set that I designed for Craftyscrappers. To finish I added some pretty sequins by Mudra Craft Stamps.

Really love the bit of sparkle that the Fairy Sparkle adds. Here is a closeup of the card.


Here are the Itsy Bitsy products I used. I have included links to the products as well.

Fleece White
Texture Tack


Fairy Sparkle - Lilac
Fairy Sparkle - Sterling Silver


I hope you enjoyed this post and will try these wonderful products. 

Love,
Nandini

Wednesday, March 15, 2017

Addicted to Stamps and More #233...

Hi! This week the theme of the challenge is 


You can make projects inspired by your favorite holidays.

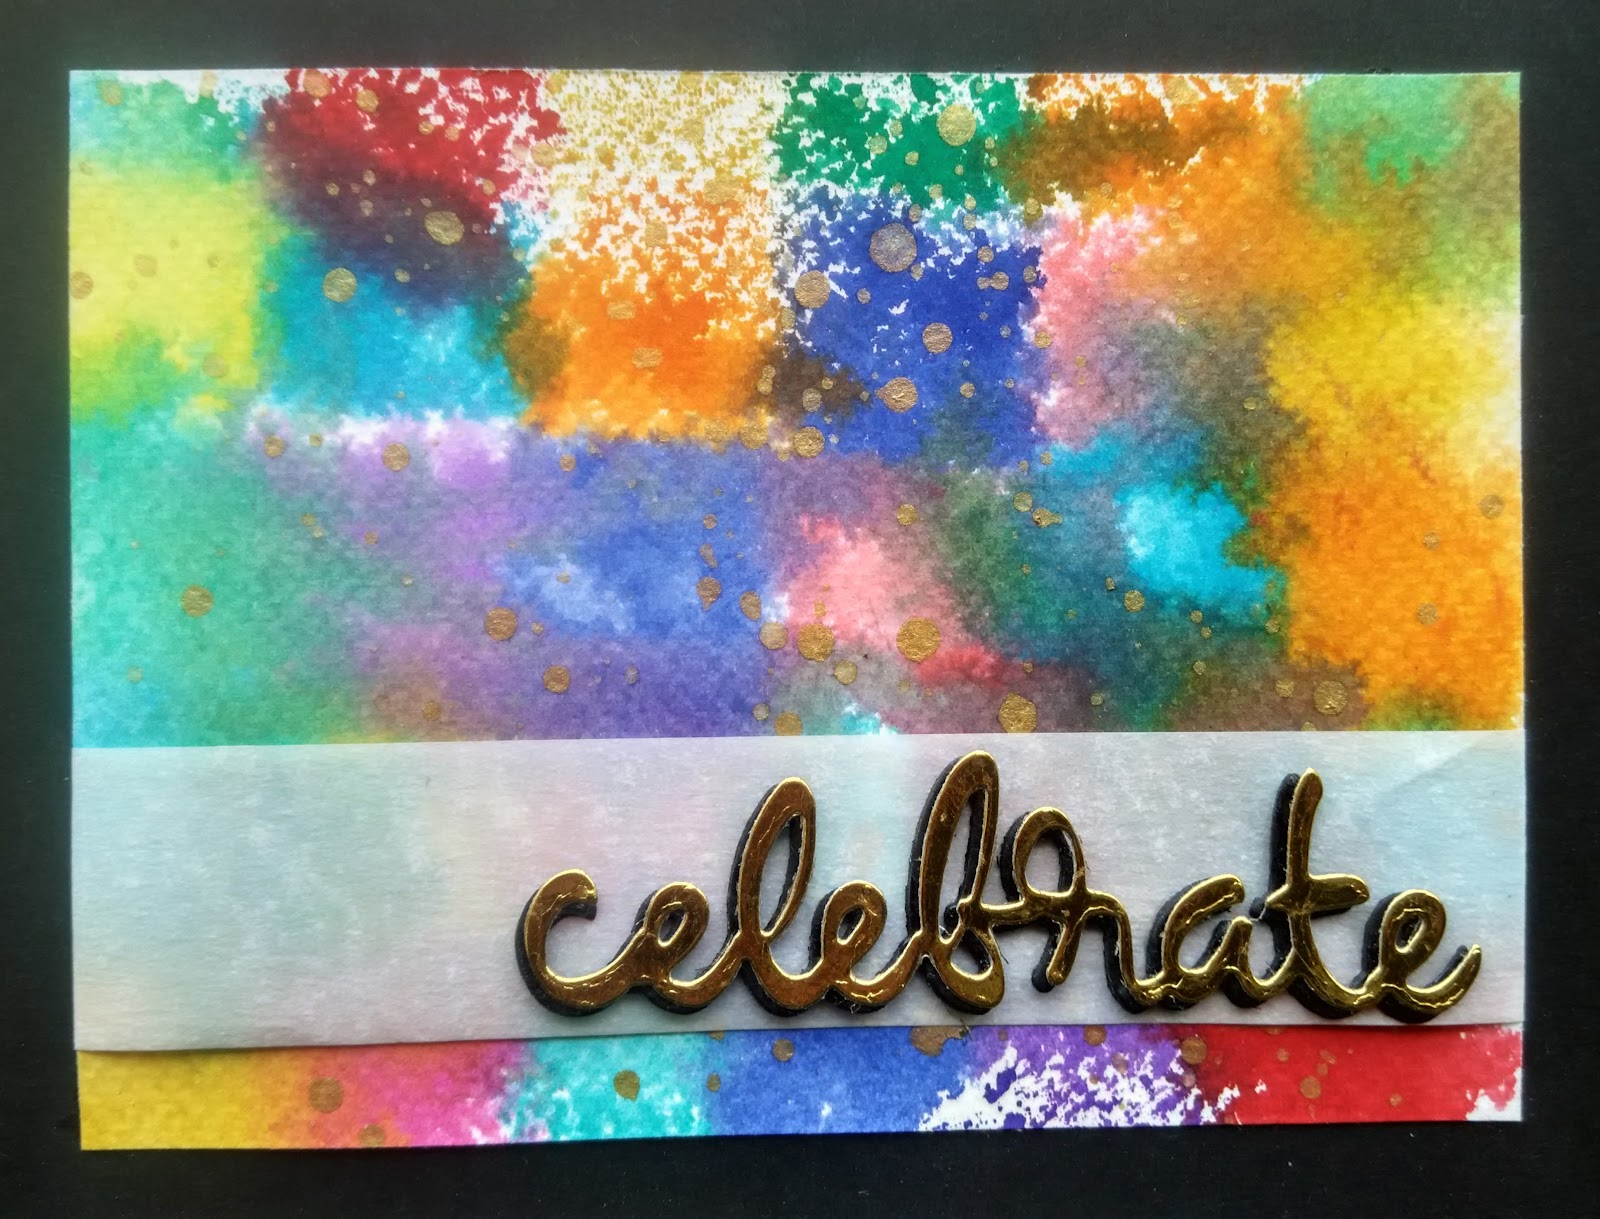
I have made a card celebrating the festival of colors, Holi.


I started with a piece of watercolor paper and used the reverse smooshing technique to color. I started with a bunch of distress ink cubes that I pressed on my craft sheet.


I then sprayed the watercolor paper generously with water and pressed the paper over the ink. The result was a richly colored panel. I let it dry completely and then splattered some gold acrylic paint on top. The panel looked so colorful and beautiful that I decided to leave it as is. I just added a strip of translucent paper towards the bottom. The sentiment is a die from Stamplorations which I cut several times from black and gold paper. I mounted the panel on a black card base.

Here is a closer look at my panel.


I hope my card inspires you to create something beautiful. Please do check out the ATSM challenge blog for some more fabulous inspiration by my fellow DT.

Entering this card in the following challenges.

HLS March Watercolor Challenge:


HLS March Anything Goes with Dies:


HLS March CAS Challenge:


Stamplorations Never-ending Anything Goes Challenge:


Inkspirational Challenge #130:


Love,
Nandini

Friday, September 2, 2016

Craftyscrappers Challenge #8...

Hi! The Craftscrappers Challenges are back after a break. We are a bi monthly challenge now. We will choose three winners who will get goodie bags from Craftyscrappers.

Since Teacher's Day falls on 5th September, we want you to make creations with your teachers in mind. You can make anything - cards, tags, bookmarks etc. Please post your beautiful creations on the Craftyscrappers Craft Challenges Face Book page.

I made a Thank You card for this challenge.


I used a new-to-me technique called Ink Layering. The original post is by Jennifer Mcguire and you can check it out here. I have put together a short tutorial which I find will be helpful.


I started with a piece of kraft card stock which I attached to my stencil with washi tape. The stencil is Peonies All Over by Stamplorations.


Then I used an ink blending foam and applied Hero Arts White Unicorn ink. The result was a beautiful white pattern on the paper. Honestly I was tempted to leave it as is!


Next I reattached the stencil but offset it slightly and used my Camlin brush pens to apply color through the stencil.


Here is the final panel after removing the stencil.


And a close up of the final. Doesn't it look like little jewels?

Rest of the card was super simple. I trimmed and then mounted the panel on a black card base. The sentiment is from Wonderful Words by CAS-ual Fridays. I stamped it with Versamark and Heat embossed with white EP. I used a ready die cut from Craftyscrappers for the sentiment. These die cuts are available at Craftyscrappers in a large variety of shapes and sizes. They are high quality and make a crafter's life so much easier! I simply grabbed the die cut, colored it with Memento Black Tuxedo ink, stamped my sentiment and heat embossed.

This time I also decorated the inside of the card.


I simply put the stencil over the cream paper and traced the design with a black pen.

I hope you are inspired by my card to create something beautiful. Please make sure to visit the Craftyscrappers Craft Challenges Face Book page for more details. You will also find more gorgeous inspiration by my talented teamies. And remember to enter your creations in the challenge. It ends on 15th September and the winners will get a goodie bag from Craftyscrappers.

Entering the card in the following challenges:

Craft Stamper Take It Make It Challenge: September - Anything Goes
I have stamped the sentiment

Creative Friday #161 - Anything Goes

NBUS Challenge #7
I have had the stencil for a very long time and used it for the first time.


Sweet Stampin Challenge - No DSP

AAA Cards Game #72 - New To You Technique
First time I used the Ink Layering technique


Love,
Nandini